n

This is default featured slide 1 title

Go to Blogger edit html and find these sentences.Now replace these sentences with your own descriptions.This theme is Bloggerized by Lasantha Bandara - Premiumbloggertemplates.com.

This is default featured slide 2 title

Go to Blogger edit html and find these sentences.Now replace these sentences with your own descriptions.This theme is Bloggerized by Lasantha Bandara - Premiumbloggertemplates.com.

This is default featured slide 3 title

Go to Blogger edit html and find these sentences.Now replace these sentences with your own descriptions.This theme is Bloggerized by Lasantha Bandara - Premiumbloggertemplates.com.

This is default featured slide 4 title

Go to Blogger edit html and find these sentences.Now replace these sentences with your own descriptions.This theme is Bloggerized by Lasantha Bandara - Premiumbloggertemplates.com.

This is default featured slide 5 title

Go to Blogger edit html and find these sentences.Now replace these sentences with your own descriptions.This theme is Bloggerized by Lasantha Bandara - Premiumbloggertemplates.com.

Page Rank

Tinggalkan sedikit Komentar untuk blog ini :)
Showing posts with label Jenis-jenis Robot. Show all posts

June 28, 2012

Jupri Dwi H, pembuat robot dari Selogiri


| | Dilihat: 4857 Kali

Bicara soal robot, kesan yang sering tebersit di pikiran adalah ilmu yang rumit dan mahal, yang hanya bisa ditekuni oleh kalangan perguruan tinggi. Padahal, dari sebuah sekolah yang mungkin sering dicap sebagai sekolah pinggiran justru muncul seorang kreator yang bukan tak mungkin bakal mengharumkan nama bangsa.
BERBAKAT -- Jufri (berseragam Pramuka) menunjukkan robot hasil karyanya. (JIBI/SOLOPOS/Trianto Hery Suryono)
Dia adalah Jufri Dwi Hanantyo, siswa SMPN 1 Selogiri, Wonogiri. Siswa Kelas VIII E ini berhasil mencuri perhatian saat dua robot karyanya dipamerkan saat pameran produk unggulan peringatan HUT Wonogiri belum lama ini. Anak bungsu pasangan Bowo Subagyo dan Ny Seni itu berhasil membuat dua robot berkemampuan dasar yaitu line follower dan wall follower. Robot jenis line follower akan bergerak menyesuaikan garis sedangkan wall follower akan berbelok ketika di depannya terdapat penghalang. “Saya terinspirasi membuat robot saat melihat robot di televisi,” ujar Jufri kepada Espos. Didampingi Kepala SMPN 1 Selogiri, Arisman dan guru pembimbingnya, Y Wahyu Widiyatmoko, Jufri bercerita dirinya mengaku penasaran dan ingin tahu lebih banyak soal robot. “Kejadian itu saya alami saat masih duduk di bangku sekolah dasar. Awalnya saya membongkar-bongkar radio yang sudah rusak. Saya dimarahi orangtua karena kerusakan radio bertambah parah,” kenangnya.
Seiring dengan bertambahnya usia dan jenjang sekolah, Jufri pun menemukan arena pelampiasan penasarannya di SMPN 1 Selogiri. Saat Kelas VII, dia mulai tekun belajar ilmu robotika. Keterampilan itu dilihat oleh guru komputer sekolah itu, Wahyu. Akhirnya Jufri pun kini dijadikan asisten guru dalam mengajar robotika.
Menurut Jufri, membuat robot tidaklah rumit. Di ruang komputer, Jufri telah membuat konsep robot lain, yakni robot yang bisa berjalan seperti manusia. “Saya ingin membuat robot petani agar bisa meringankan beban manusia,” ungkapnya.
Guru pembimbing, Wahyu menyatakan bahan cukup mudah didapatkan. “Untuk bodi kami pakai aluminium namun komponen motor harus pesan ke Surabaya. Selama ini kami order ke Surabaya dengan pola transfer. Kami transfer uang, barang akan dikirim dua hingga tiga hari kemudian. Kalau tidak ada alumunium, sebagai eksperimen kami terkadang menggunakan kotak plastik dan sendok kayu es krim,” paparnya.
Sementara itu, Kepala SMPN 1 Selogiri, Arisman mengaku keterampilan membuat robot menjadi unggulan di sekolah. “Kami masih kesulitan mencara bibit penerus Jufri. Mudah-mudahan tahun ajaran nanti penerus itu bisa diperoleh.”
Trianto Hery Suryono

February 23, 2012

Making Sensors


Overview | Download | Documentation | Sample Projects  
Making a GoGo board | Board Versions | Links | FAQ
 
Making Sensors
revision 0.91
by Arnan (Roger) Sipitakiat
arnans@media.mit.edu
Please visit http://www.gogoboard.org for the latest version of this document.
[Printer friendly PDF version]

Contents:
Knowing how sensors work on the GoGo board
Resistance
In most cases, the value you get from a sensor indicates the "resistance" of the sensor. Resistance is a very basic property of any material. Metal has extremely low resistance. Thus, they conduct electricity very well. On the other hand, plastic or rubber have very high resistance. Almost no electricity can flow though them. That is why we use them to coat electricity wires.
Here is a simple rule: the higher the resistance, the higher value you will get from the GoGo board. Since air does not conduct electricity (unless you have a very high voltage), your get 1023 (the highest reading) from a sensor port without a sensor connected.  It is then not hard to guess that when you get a reading of zero, it means your sensor has no resistance (like a piece of wire).
There are also many sensors that change their resistance according to some particular property of the environment. Examples of these sensors include light, temperature, pressure, etc.
Calculating the sensor readings
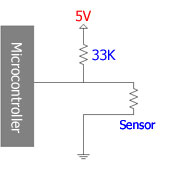
For those who are interested in the deeper technical details, there is a 33K reference resistor on each sensor port, which is used to determine the readings you get. The figure below shows how the reference resistor is arranged. The Microcontroller measures the voltage drop across the sensor, which can be calculated from the following equation.
V = 5 x ( Rs / (33K + Rs))  
Where Rs = Sensor resistance
Now, we know that if the voltage drop is 5v, we get a reading of 1023. We can use the same equation to determine the sensor readings directly.
Sensor Readings = 1023 x (Rs / (33k + Rs))
For example if our sensor has a resistance of 10k Ohm, our sensor reading will be:
1023 x (10000 / (33000 + 10000)) = 238
Sensor ports on the GoGo board
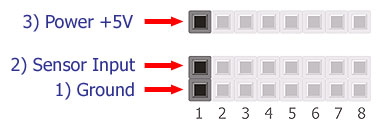
The GoGo board has eight sensor ports. Each of them has three pins, as shown in the illustration below. Rows one and two (Ground and Sensor Input) are the ones most simple sensors use. Row three is an extra power supply for active sensors that needs a power source to function properly.


Active and Passive Sensors
Sensors that have been mentioned so far are called passive sensors. They do not need separate power to operate. Active sensors, on the other hand, are sensors that need their own power. An easy way to distinguish active sensors from passive ones is to count the number of pins it has. Active sensors have an extra third pin to get the power it needs while passive sensors have only two.
Active sensors are more complex, but they open up a broad range of sensing possibilities. Examples of active sensors include Infrared sensors [it detects presence, distance], Hall effect sensors [detects magnetic field], noise sensors, vibration sensors, etc.

Making Passive Sensors
Here you will see how to make three passive sensors: touch, light, and temperature. All passive sensors only need two pins (pin 1 and 2 ).
Touch Sensors
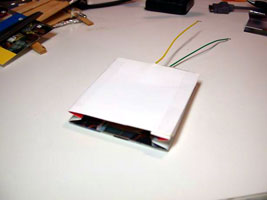
Touch sensors are one of the simplest sensors but yet they are most useful. The general ideas is very simple: you have two conductive objects that would touch each other when activated (i.e. pressed, stepped on) or vise versa. Here are some examples of touch sensors.
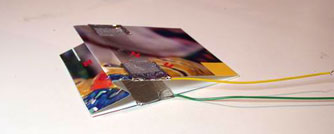
Paper and Aluminum foil.
This is probably the easiest way to make a touch sensor. You attach some aluminum foil to two pieces of paper that are folded in a way that will make the foil touch when pressed. You then connect one lead to each foil. You can, of course, replace aluminum foil with other conductive elements (i.e. paper clips  or nails).


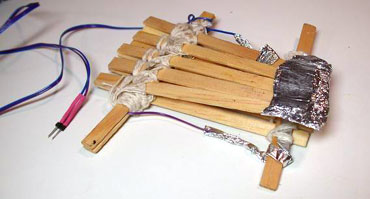
Ice-cream sticks and aluminum foil.
Ice-cream sticks are excellent for making simple structures. It is stronger than paper. Therefor, when used with aluminum foil, we can make touch sensors that are much more rigid. The following picture shows one example.


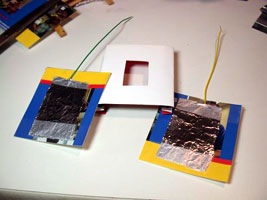
Sandwich touch sensors
Making this type of sensor you need two conductive contacts sandwiching a non-conductive material. Overhead transparency films are nice as they are flexible. You can stick or glue aluminum foil to them and use two of them to sandwich a piece of cardboard paper. You punch holes in the cardboard allowing the foils to touch when pressed.


Commercial switches
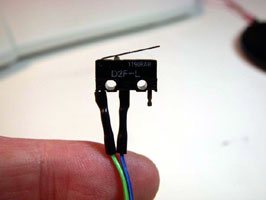
You can also buy switches from electronic stores and attach them to the GoGo board. These switches come in many shapes and sizes. The most common ones are lever switches and push buttons.


Light Sensors
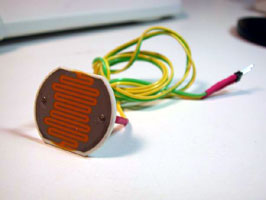
The most common light sensor is called LDR (Light Dependant Resistor). They are also known as "Photo cells." A LDR is basically a resistor that changes its resistance when light intensity changes. You often see them in automatic light stands.
Since LDRs are simply resistors, you can just simply connect the two pins from the sensor to the GoGo board.


A Simple Humidity Sensor
You can simply connect two wires or paper clips to pins 1 and 2 of the GoGo board to measure humidity in the soil. When the soil gets moist, it conducts more electricity. Thus, the sensor readings you get will change as the soil humidity changes. This same idea can be used to make a water detector sensor. When the two wires touch water, the sensor readings will change. 
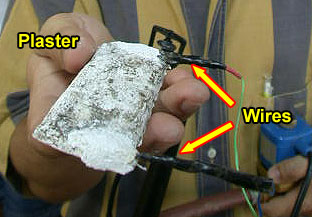
You can improve the humidity sensor by connecting the two wires to a piece of gypsum, plaster, or any other material that absorbs water. The idea is still the same but you are improving the purity of the conductive medium. The sensor's behavior will not change too much from one place to another. Gypsum is the material they use to make building interiors (ceilings, walls, etc). Plaster is also used to cover walls and to make a patient's cast.


Temperature Sensors
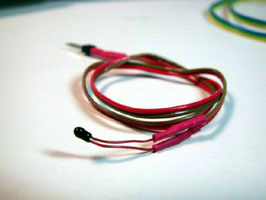
To make a temperature sensor, you will need to find a thermistor. Some thermistors are simply resistors that changes their resistance as temperature changes. Other thermistors are active sensors that need extra power to function.


Making Active Sensors
Here are examples of useful active sensors.

Reflective Light Sensors
This type of sensor is useful when you want to detect object presence without touching it. For example, you want to detect when someone walks through a door, or when someone's hand gets too close.
A simple idea for this sensor is to beam light on to a LDR (light sensor). If something passes by, it blocks the light and the LDR detects it. If the light source is a light bulb, then you are simply detecting shadows. If you use a laser pointer as you light source, you detection range can be very far and you readings will be very precise.
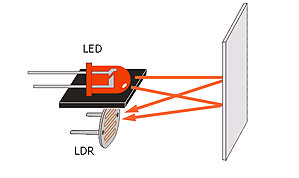
There is another idea to accomplish the same task. You can beam light outwards and measure the amount of light that is reflected back.  When there is nothing to block the light, the reflected light will be very small. However, if an object blocks the light, it reflects more the light back. This is what we call a reflective light sensor. The benefit of this kind of sensor is that the sensor is located all in one place and no alignment is needed when you change the direction of the sensor.
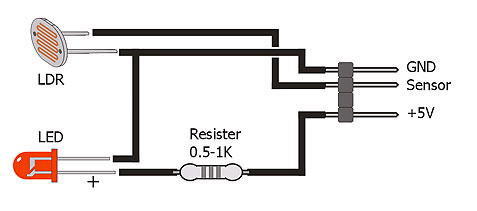
You can make reflective sensors simply with an LED and an LDR. You need to use a bright LED. This works but the detection range will be limited (less than 1 inch).  There can also be a lot of interferences from external light sources as well.
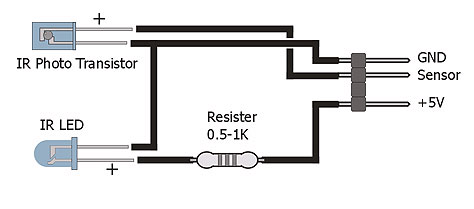
Here is a schematic of how this sensor can be built for the GoGo board. Theresistor is there to limit the current that goes through the LED. The smaller the resistor value the brighter the LED.
Using Infrared (IR) Light
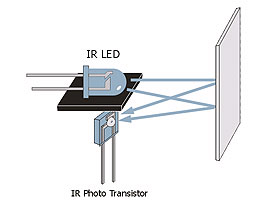
A better version of the above reflective sensor is to use Infrared light (IR), as there is much less interferences. IR is a kind of light that humans cannot see. This is nice when you do not want people to see your sensor (i.e. in security systems).
Notice in the diagram that we use an IR phototransistor instead of the LDR. In this case, the two functions the same way, but the IR phototransistor is much more sensitive to IR light than an LDR. The following is a schematic of how to build this sensor.
Commercial Reflective Sensors
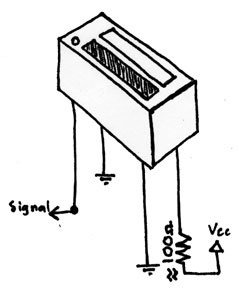
You can also buy commercial IR reflective sensors as well. They normally come in a compact size and the sensor readings are more reliable.
[ example of commercial IR reflective sensors]
Here is an example of how to assemble a commercial  IR reflective sensor (digikey.com partnumber QRD1114-ND).


Hall Effect (magnetic field)  Sensor
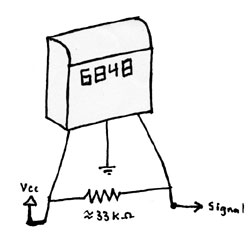
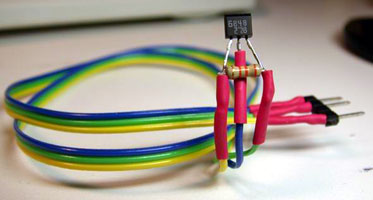
You can use this sensor to detect the presence of magnets. The applications are similar to the IR reflective sensor but they do not depend on light, which often means they are more reliable. However, you need to have a magnet while light is almost everywhere.
Here's an example of how to assemble a Hall Effect sensor (from digikey.com, part number DN6848-ND)


Where to find sensors
In the US, many places sell sensors. Radio shack is one of the most common places to look for. There are also on-line stores that provides even larger collection of sensors. Here is a list of a few websites that you should know:
  • www.radioshack.com - website of the famous electronics retail store.
  • www.allelectronics.com - This site has a huge collection of low-cost electronics parts. If price is your biggest concern, this is where to go.
  • www.digikey.com - This is one of the largest on-line electronic store on the Internet.Here are a few digikey sensor part numbers:
     

    SensorPart Number
    ThermistorKC005T-ND
    Push buttonSW411-ND
    Lever switchSW152-ND
    IR reflectiveQRD1114-ND
    Hall EffectDN6848-ND


Other references


 Last updated: 9/25/2003

November 24, 2011

Penjelasan mendasar tentanbg Resistor

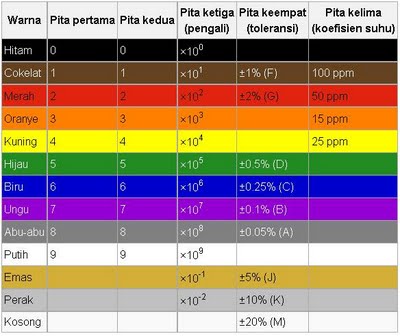
Resistor adalah suatu komponen yang berfungsi sebagai tahanan / hambatan dalam menahan arus masuk. Pada resistor terdapat gelang warna yaitu gelang pertama  tidak boleh langsung berwarna hitam serta pada gelang ketiga berwarna emas, perak, tanpa warna ( emas x 1/10 dan perak x 1/100 ). dan resistor memiliki beberapa Ukuran atau jenisnya,..dalam hal ukuran mulai dari 1/2 , 1/4, 1/8, 2, 3, dan emapat serta jenisnya berdasarkan jumplah gelang atau pita yang melingkar, ada yang 4 gelang, 5 gelang. Gelang terakhir sebagai toleransi penghitungan,……serta memiliki satuan seperti, OHM, KILO, MEGA,
perhatikan gambar dibawah ini,….
Satuan Simbol
Resistor.
Jenis Ukuran Resistor
Gambar Ukuran Resitor.
Tabel Warna.
Nilai Warna Pada Resistor
Pengkodean Warna
Penghitungan Warna dan Toleransi
Label, Skema atau gambar di atas smuanya menunjukan Nilai dan Pengkodean setiap Gelang warna yang ada pada resistor.
Sebagai Pembelajaran Perhatikan Tabel dibawah ini ;
No
Susunan Warna
Nilai
Keterangan
1.
Coklat, Hitam, emas, emas 1 Ohm Bertorleransi  5%
2.
Coklat, Hitam, Hitam, Emas 10 Ohm Bertorleransi  5%
3.
Coklat, Hitam , Orange, Emas 10 K / Kilo Bertorleransi  5%
4.
Coklat, Hitam, Kuning, Emas 100 K / Kilo Bertorleransi  5%
5.
Coklat, Hitam, Biru, Emas 10 Mega Bertorleransi  5%
6.
Coklat, Hitam, Emas, Perak 1,0 Ohm Bertorleransi  10%
7.
Orange, Putih, Emas, Perak 3,9 Ohm Bertorleransi  10%
8.
Hijau, Hitam, Perak, Emas 0,5 Ohm Bertorleransi  5%
Tabel Penghitungan diatas sebagai referensi kalian untuk mencoba dan mengamati cara penghitungan nilai gelang resistor dan cara pengkodeanya,……

November 22, 2011

Robot line follower to jupri dwi hananto (smp n 1 selogiri)


Line Follower adalah sebuah robot yg dapat mengikuti 
jalur 
garis berwarna hitan (warna lain) secara otomatis. dan ini adalah 
salah satu karya snp n 1 selogiri sebuah robot line follower sederhana.
line follower ini menggunakan sensor IR (infra merah)
dengan oscilator 36khz lm 324n.


November 19, 2011

Robot Woll Follower (smp n 1 selogiri)


 Robot Woll Follower 
Download Video KLik Disini

Robot ini adalah karya kami segenap kerabat kerja smp n 1 selogira. ini adalah salah satu buah karya jupri dwi hanantyo. allaham dulilah sekarang smp n 1 selogiri telah mampu membuat robot walaupun hanya sebuah robot sederhanan. Smp 1 selogiri telah mengembangkan bakant siswa dalam bidang IT terutama dalam bidang Robotika, dengan menambahkan ekstra kulikuler ROBOTIK. namun untuk tingkatan sekolah menengah pertama robotik masih terlalu rumit. karena itu kami hanya memberikan pengetahuan dasar mengenai robot dan praktek pembuatanya dan perakitannya. 
tahun pertama kamin mencoba membuat robot line follower dan inilah hasilnya.

Robot Wall follower
Dalam krci beroda dan krci berkaki, untuk menyelusuri ruangan, umumnya robot-robot menggunakan algoritma wall following atau dead reckoning atau campuran keduanya.
Seperti namanya, algoritma wall following, “pengikut dinding”, robot akan bergerak mengikuti dinding. ada yang nge-wall kanan, ada yang nge-wall kiri. algoritma wall following adalah algoritma yang lebih sederhana tetapi sangat stabil. namun algoritma ini belum cukup untuk menyelusuri semua ruang. umumnya robot akan susah memasuki ruangan 4.
algoritma dead reckoning bisa membuat robot terlihat lebih pintar. robot bisa mengenali ruangan dan kembali ke home dengan jalur terpendek (shortest path). tetapi, algoritma ini sangat rentan terhadap error. ide algoritma ini adalah mengenali posisi sekarang dari pengenalan posisi sebelumnya. jika pengenalan sebelumnya error, bisa dipastikan pengenalan posisi sekarang juga pasti error. umumnya robot yang memakai algoritma ini, ketika bagus, robot akan menyelesaikan misi dengan sempurna, tetapi ketika error, perform robot akan menjadi sangat jelek.


Robot line Following Karya anak SMP N 1 Selogiri


 Robot line follower 
download Video klok Disini 

Robot ini adalah karya kami segenap kerabat kerja smp n 1 selogira. ini adalah salah satu buah karya jupri dwi hanantyo. allaham dulilah sekarang smp n 1 selogiri telah mampu membuat robot walaupun hanya sebuah robot sederhanan. Smp 1 selogiri telah mengembangkan bakant siswa dalam bidang IT terutama dalam bidang Robotika, dengan menambahkan ekstra kulikuler ROBOTIK. namun untuk tingkatan sekolah menengah pertama robotik masih terlalu rumit. karena itu kami hanya memberikan pengetahuan dasar mengenai robot dan praktek pembuatanya dan perakitannya. 
tahun pertama kamin mencoba membuat robot line follower dan inilah hasilnya.

Robot Line Follower 
Robot Line Follower adalah sebuah robot yg dapat mengikuti garis secara otomatis. robot ini menggunakan dua buah sensor inframerah yaitu Phototransistor. cara kerja robot line follower ini adalah
bila sensor kanan membaca garis hitam maka roda kiri akan bertgerak kebelakang. maka robot akan bergerak atau berbelok ke kanan.
bila sensor kiri membaca garis hitam maka roda kanan akan bergerak ke belakang, maka robot akan bergerak atau berbelok ke kiri.